 |
| Everyone hides behind a mask. What's underneath is generally never pretty |
May 25, 2012
On a completely unrelated tangent..
May 22, 2012
Easy Trick: Thick Lashes using Loose/Talcum Powder
Apart from a healthy diet and gentle care, do you know what can help you get thicker and longer looking lashes? Talcum Powder!! Yes, that's right! When used sensibly, talcum powder is actually a very handy tool. It can:
 -Help mattify oily areas on your face. Just rub a small amount between your palms, clap a few times and blot your face.
-Save you from oily roots. Just rub a small amount on your palms and finger comb through your roots. Brush your hair.
-Make your lipstick last longer by first applying it, then blotting on a tissue. Pat a small amount of powder on your lips to mattify and re apply the lipstick.
- Make your lashes look thick & long (I will show you how)
These are my fav uses of Talc. What are yours??
How to make your lashes thick and long?


You will need:
-Eyelash curler (optional but recommended)
-Mascara (I'm using Maybelline's Colossal Volum' Express Mascara- waterproof)
-Talcum powder
-Fluffy brush.
This is how my lashes look before and after curling and mascara:
After applying a coat of mascara, Using a fluffy brush, dust your lashes with talcum powder. Gently wipe away the excess with the same brush.


Now apply the second coat of mascara, and Voila!

Haha! You can see the reflection of my camera in my eyeball!!
Here is a before after comparison of normal mascara and powder trick mascara:


If you want to use this trick when you apply eyeshadow, simply apply one coat mascara and powder beforehand, finish your eye makeup and the apply the second coat!
What are your favorite Rescue Tricks?
-Save you from oily roots. Just rub a small amount on your palms and finger comb through your roots. Brush your hair.
-Make your lipstick last longer by first applying it, then blotting on a tissue. Pat a small amount of powder on your lips to mattify and re apply the lipstick.
- Make your lashes look thick & long (I will show you how)
These are my fav uses of Talc. What are yours??
How to make your lashes thick and long?


You will need:
-Eyelash curler (optional but recommended)
-Mascara (I'm using Maybelline's Colossal Volum' Express Mascara- waterproof)
-Talcum powder
-Fluffy brush.
This is how my lashes look before and after curling and mascara:
 | |
| Mascara |
 |
| Normal |
 | ||
| Curled |


Now apply the second coat of mascara, and Voila!

Haha! You can see the reflection of my camera in my eyeball!!
Here is a before after comparison of normal mascara and powder trick mascara:
If you want to use this trick when you apply eyeshadow, simply apply one coat mascara and powder beforehand, finish your eye makeup and the apply the second coat!
What are your favorite Rescue Tricks?
Super Easy Smokers
Say hello to my first official smokey eye post! I remember how when i had just started experimenting with makeup, my basic smokey eye looked like i had used the burn tool on my eye lid. I would smudge my kajal and mattify the whole thing by using talcum powder. T'was actually a very simple and decent look.
Up and till Maybelline released it's Colossal Kajal, I did not find a single, affordable drugstore Kajal that did not smudge. I tried Biotique, Shahnaz, Himalya, VLCC, Elle 18, Lakme and Lotus. All of then smudged even though some claimed to be smudge free. Obviously, now i only use Maybellinebut all hope is not lost for the oily smudgy kajals out there! Here's a technique that lets you create a very simple smokey eye using colored eyeshadow.
All you need is:
A kajal stick (I am using my Ell8 18 Kajal.)
Eye shadow
Q Tip or Ear bud
Fluffy Brush

1. Start with your normal foundation routine and fill in your eyebrows. DO NOT apply concealer or primer on your eyes. This step comes later. Just draw a thin line with your kajal stick.

2. Using a Q tip or ear bud, smudge the kajal all over your eyelid, till just above the crease. Depending on the kajal that you use, you may have to re-draw and re-smudge till you have the desired gray base. You may also use your finger to smudge the kajal, but using a Q tip gives better control over the shape.

3. Load a fluffy brush up with eyeshadow and pat it on to the eye lid. Here, the smudged kajal acts as a primer base for the pigment to stick on to.
4. From here, there are two kinds of smokey eyes that can be done. a) where the lid is darker than the crease and b) where the crease is darker than the lid.
a) Draw another line on the lid with the kajal. This time do not smudge it, just gently blend the harsh line away. Apply another layer of eyeshadow. You will notice that you will get a dark to light gradient effect. If you feel that your eye makeup is still greasy, lightly dust it with more eye shadow till you are satisfied. You can also adjust the darkness of the look by adjusting the amount of kajal you use.Highlight you brow bone and inner corner. Line your eyes with a liquid eyeliner, apply kajal on your waterline and mascara to finish the look.


b) Use the Kajal on the outer corner of your lid. Use the Q tip or ear bud to blend it inwards. Using the fluffy brush, apply eye shadow. If your eyelid is still greasy, then use more eyeshadow. Repeat these steps till the look is dark enough and till you are satisfied. I had to do it twice. Highlight your brow bone and inner corner. Finish off with liquid liner, kajal and mascara.


5. Now, use concealer under your eyes (if required) and set it with powder. Finish off with your favourite, most natural looking blush and pinkish-nude lips.
Here are photos of Look B (My fav) in Lavender and Beige:
Sometimes, depending on the shape of your eye, one of the two techniques will look better on you. So experiment, and figure out your smokey eye look! Have fun experimenting with different colors and do comment if you want to see a picture of any particular color. Good Luck!
Up and till Maybelline released it's Colossal Kajal, I did not find a single, affordable drugstore Kajal that did not smudge. I tried Biotique, Shahnaz, Himalya, VLCC, Elle 18, Lakme and Lotus. All of then smudged even though some claimed to be smudge free. Obviously, now i only use Maybellinebut all hope is not lost for the oily smudgy kajals out there! Here's a technique that lets you create a very simple smokey eye using colored eyeshadow.
All you need is:
 |
| Kajal: "I have seen better days". |
Eye shadow
Q Tip or Ear bud
Fluffy Brush
 | |
| Glittery Royal Blue |

1. Start with your normal foundation routine and fill in your eyebrows. DO NOT apply concealer or primer on your eyes. This step comes later. Just draw a thin line with your kajal stick.

2. Using a Q tip or ear bud, smudge the kajal all over your eyelid, till just above the crease. Depending on the kajal that you use, you may have to re-draw and re-smudge till you have the desired gray base. You may also use your finger to smudge the kajal, but using a Q tip gives better control over the shape.

3. Load a fluffy brush up with eyeshadow and pat it on to the eye lid. Here, the smudged kajal acts as a primer base for the pigment to stick on to.
4. From here, there are two kinds of smokey eyes that can be done. a) where the lid is darker than the crease and b) where the crease is darker than the lid.
a) Draw another line on the lid with the kajal. This time do not smudge it, just gently blend the harsh line away. Apply another layer of eyeshadow. You will notice that you will get a dark to light gradient effect. If you feel that your eye makeup is still greasy, lightly dust it with more eye shadow till you are satisfied. You can also adjust the darkness of the look by adjusting the amount of kajal you use.Highlight you brow bone and inner corner. Line your eyes with a liquid eyeliner, apply kajal on your waterline and mascara to finish the look.


b) Use the Kajal on the outer corner of your lid. Use the Q tip or ear bud to blend it inwards. Using the fluffy brush, apply eye shadow. If your eyelid is still greasy, then use more eyeshadow. Repeat these steps till the look is dark enough and till you are satisfied. I had to do it twice. Highlight your brow bone and inner corner. Finish off with liquid liner, kajal and mascara.


5. Now, use concealer under your eyes (if required) and set it with powder. Finish off with your favourite, most natural looking blush and pinkish-nude lips.
 | ||
| Look A |
 |
| Look A |
 | |
| Look B |
 | |
| Look B |
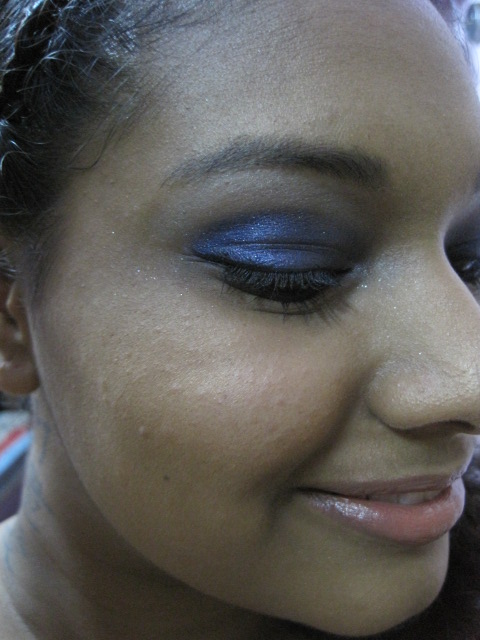
Here are photos of Look B (My fav) in Lavender and Beige:
 | |
| Lavender |
 | |
| Beige |
Sometimes, depending on the shape of your eye, one of the two techniques will look better on you. So experiment, and figure out your smokey eye look! Have fun experimenting with different colors and do comment if you want to see a picture of any particular color. Good Luck!
May 20, 2012
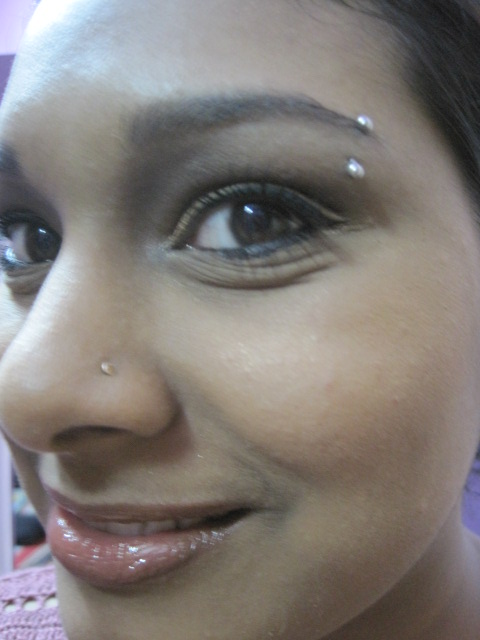
Salma Hayek Makeup
Another post on olive skinned Hollywood women! I found this picture of Salma Hayek. Its from a photo shoot for some Magazine.

I'm not sure which magazine this was for, but her makeup is just GORGEOUS isn't it? It such a nice look for her skin tone. Fun, vivid and yet not too overboard. I would say it's a pretty wearable look for really dressy occasions like weddings (you know how Indian weddings are, 100 different affairs).. Here's a close-up of her face:

So here's a simple and easy tutorial showing you how to achieve this look:
 1. Start with your regular foundation routine. Fill in your brows (if necessary) and apply primer to your eyelid. Use a heavy duty one for this look, or simply apply a very thin layer of Vaseline to your eyelid.
 2. Use a bright bubble gum pink on your eyelid. Stay within the crease line, and extend it outwards as if you are creating a wing. In this look, the eyeshadow colors are very solid, so layer on the color. That is why I mentioned a heavy duty primer.

3. Use a hot purple color above the pink. This color will partly visible above the crease line. Extend this color out too, and using an ear bud or Q Tip dipped in makeup remover (you can even use cleansing milk or moisturizer) Sharpen the wing created with the two colors.

4. Take an angled brush, eyeliner brush or any tiny brush that you have, and apply a bright sky blue color on your inner corner. Pull it down while making a small cat eye wing. Again, use an ear bud or Q tip to sharpen the shape.

5. Highlight your brow bone and line your eyes with liquid eyeliner. I have used black, but you may also try a dark purple, midnight blue or dark brown eyeliner. Just make sure that you use a liquid or gel liner, not pencil, because the line need to be sharp and crisp. Create a wing inside and outside like so. I lined my waterline with kajal, but you could also use a white pencil to make your eyes look bigger and brighter. Finish off with Mascara.

6. To finish off the look i used a peachy blush on my cheeks and lip color. In the photo her lips look like they are stained and a gloss has been used. I don't own that particular color so i custom made the color for myself. I used a lip balm on my lips, and patted in a bright pink eyeshadow. Then i topped that with my red lipstick (I did not directly apply, but used my finger to give a very thin cover) and blended. Finished off with clear gloss.
Personally, I really like the bright colors on my dusky skin tone. Because of the bubble gum pink, this combo will look very pretty on fair skinned people too, but I recommend using a baby pink blush instead of a peach one. Here are some more photos of the completed look!


I'm not sure which magazine this was for, but her makeup is just GORGEOUS isn't it? It such a nice look for her skin tone. Fun, vivid and yet not too overboard. I would say it's a pretty wearable look for really dressy occasions like weddings (you know how Indian weddings are, 100 different affairs).. Here's a close-up of her face:

So here's a simple and easy tutorial showing you how to achieve this look:
 1. Start with your regular foundation routine. Fill in your brows (if necessary) and apply primer to your eyelid. Use a heavy duty one for this look, or simply apply a very thin layer of Vaseline to your eyelid.
  2. Use a bright bubble gum pink on your eyelid. Stay within the crease line, and extend it outwards as if you are creating a wing. In this look, the eyeshadow colors are very solid, so layer on the color. That is why I mentioned a heavy duty primer.
3. Use a hot purple color above the pink. This color will partly visible above the crease line. Extend this color out too, and using an ear bud or Q Tip dipped in makeup remover (you can even use cleansing milk or moisturizer) Sharpen the wing created with the two colors.

4. Take an angled brush, eyeliner brush or any tiny brush that you have, and apply a bright sky blue color on your inner corner. Pull it down while making a small cat eye wing. Again, use an ear bud or Q tip to sharpen the shape.

5. Highlight your brow bone and line your eyes with liquid eyeliner. I have used black, but you may also try a dark purple, midnight blue or dark brown eyeliner. Just make sure that you use a liquid or gel liner, not pencil, because the line need to be sharp and crisp. Create a wing inside and outside like so. I lined my waterline with kajal, but you could also use a white pencil to make your eyes look bigger and brighter. Finish off with Mascara.

6. To finish off the look i used a peachy blush on my cheeks and lip color. In the photo her lips look like they are stained and a gloss has been used. I don't own that particular color so i custom made the color for myself. I used a lip balm on my lips, and patted in a bright pink eyeshadow. Then i topped that with my red lipstick (I did not directly apply, but used my finger to give a very thin cover) and blended. Finished off with clear gloss.
Personally, I really like the bright colors on my dusky skin tone. Because of the bubble gum pink, this combo will look very pretty on fair skinned people too, but I recommend using a baby pink blush instead of a peach one. Here are some more photos of the completed look!


May 16, 2012
Penelope Cruz: Oscar's Makeup (2009)
It's time for olive-skinned beauties from *drum roll* HOLLYWOOD!! I found this picture of Penelope Cruz kissing her Award for best supporting actress for her work in Vicky Cristina Barcelona.

I must say I LOVED her in that movie. She pulled of the sultry and carefree artist beautifully! This post isn't about her look in the movie though, it's about the makeup she's wearing in the photo. It's a golden smokey eye. Here is a clearer picture:

Today I decided to imitate this wearable, yet glamorous celebrity look from the 2009 Oscar's. I think gold eyeshadow NEVER gets old, and wearing a smoky look with nude lips doesn't either. Here's how you can achieve this:

 2. Using a shimmery bronze eyeshadow, apply it all over the lid. Be careful NOT TO GO over the crease line, and keep the color concentrated to the inner and outer corners.
 3. Dust your finger with a bright gold color and pat it on to the center of your lid. This will reflect light and make your eyes look bigger. The thin dust of bronze will also balance out the brightness of the gold.

 4. Using a dark brown matte eyeshadow, start creating a smoky effect by using a fluffy brush and following the natural shape of your socket. Start to contour your eyes while blending with the gold colors.
 5. Use a white-gold color on your brow bone and inner corner to highlight. Line your upper and lower lash line using the dark brown on an angled brush.
 6. Finally, line your eyes using kajal and black liquid liner. Create a very small wing. Finish off with mascara on the top and bottom.
 7. For the rest of the face, use a super light touch of your favorite blush, and finish off with a rusty gloss. Penelope has used a light peach/coral shade, but that looks way too vibrant on dusky skin. I used a reddish shade of brown: rust.


I must say I LOVED her in that movie. She pulled of the sultry and carefree artist beautifully! This post isn't about her look in the movie though, it's about the makeup she's wearing in the photo. It's a golden smokey eye. Here is a clearer picture:

Today I decided to imitate this wearable, yet glamorous celebrity look from the 2009 Oscar's. I think gold eyeshadow NEVER gets old, and wearing a smoky look with nude lips doesn't either. Here's how you can achieve this:

1. Start with your foundation routine. Apply foundation, concealer and set it with powder. Fill in your brows if required. Get a caramel brown matte eyeshadow, apply this like a wash all over your lid, slightly above the crease line. Using a wash is always a good idea because it evens out the skin tone of your eye lid.


 4. Using a dark brown matte eyeshadow, start creating a smoky effect by using a fluffy brush and following the natural shape of your socket. Start to contour your eyes while blending with the gold colors.

And, you're done! Here are some more pictures of the completed look. I tied my hair into a messy bun and sprayed some hair spray to keep strays in control. Personally, I'm lovin' it!!!


I would love to try some requests, if any. Do leave a comment!
xoxo
Subscribe to:
Posts (Atom)