
Showing posts with label Smokey eye. Show all posts
Showing posts with label Smokey eye. Show all posts
October 01, 2013
5 Minute Ladies Night Look!

August 27, 2013
How to: Red Lips

May 22, 2012
Super Easy Smokers
Say hello to my first official smokey eye post! I remember how when i had just started experimenting with makeup, my basic smokey eye looked like i had used the burn tool on my eye lid. I would smudge my kajal and mattify the whole thing by using talcum powder. T'was actually a very simple and decent look.
Up and till Maybelline released it's Colossal Kajal, I did not find a single, affordable drugstore Kajal that did not smudge. I tried Biotique, Shahnaz, Himalya, VLCC, Elle 18, Lakme and Lotus. All of then smudged even though some claimed to be smudge free. Obviously, now i only use Maybellinebut all hope is not lost for the oily smudgy kajals out there! Here's a technique that lets you create a very simple smokey eye using colored eyeshadow.
All you need is:
A kajal stick (I am using my Ell8 18 Kajal.)
Eye shadow
Q Tip or Ear bud
Fluffy Brush

1. Start with your normal foundation routine and fill in your eyebrows. DO NOT apply concealer or primer on your eyes. This step comes later. Just draw a thin line with your kajal stick.

2. Using a Q tip or ear bud, smudge the kajal all over your eyelid, till just above the crease. Depending on the kajal that you use, you may have to re-draw and re-smudge till you have the desired gray base. You may also use your finger to smudge the kajal, but using a Q tip gives better control over the shape.

3. Load a fluffy brush up with eyeshadow and pat it on to the eye lid. Here, the smudged kajal acts as a primer base for the pigment to stick on to.
4. From here, there are two kinds of smokey eyes that can be done. a) where the lid is darker than the crease and b) where the crease is darker than the lid.
a) Draw another line on the lid with the kajal. This time do not smudge it, just gently blend the harsh line away. Apply another layer of eyeshadow. You will notice that you will get a dark to light gradient effect. If you feel that your eye makeup is still greasy, lightly dust it with more eye shadow till you are satisfied. You can also adjust the darkness of the look by adjusting the amount of kajal you use.Highlight you brow bone and inner corner. Line your eyes with a liquid eyeliner, apply kajal on your waterline and mascara to finish the look.


b) Use the Kajal on the outer corner of your lid. Use the Q tip or ear bud to blend it inwards. Using the fluffy brush, apply eye shadow. If your eyelid is still greasy, then use more eyeshadow. Repeat these steps till the look is dark enough and till you are satisfied. I had to do it twice. Highlight your brow bone and inner corner. Finish off with liquid liner, kajal and mascara.


5. Now, use concealer under your eyes (if required) and set it with powder. Finish off with your favourite, most natural looking blush and pinkish-nude lips.
Here are photos of Look B (My fav) in Lavender and Beige:
Sometimes, depending on the shape of your eye, one of the two techniques will look better on you. So experiment, and figure out your smokey eye look! Have fun experimenting with different colors and do comment if you want to see a picture of any particular color. Good Luck!
Up and till Maybelline released it's Colossal Kajal, I did not find a single, affordable drugstore Kajal that did not smudge. I tried Biotique, Shahnaz, Himalya, VLCC, Elle 18, Lakme and Lotus. All of then smudged even though some claimed to be smudge free. Obviously, now i only use Maybellinebut all hope is not lost for the oily smudgy kajals out there! Here's a technique that lets you create a very simple smokey eye using colored eyeshadow.
All you need is:
 |
| Kajal: "I have seen better days". |
Eye shadow
Q Tip or Ear bud
Fluffy Brush
 | |
| Glittery Royal Blue |

1. Start with your normal foundation routine and fill in your eyebrows. DO NOT apply concealer or primer on your eyes. This step comes later. Just draw a thin line with your kajal stick.

2. Using a Q tip or ear bud, smudge the kajal all over your eyelid, till just above the crease. Depending on the kajal that you use, you may have to re-draw and re-smudge till you have the desired gray base. You may also use your finger to smudge the kajal, but using a Q tip gives better control over the shape.

3. Load a fluffy brush up with eyeshadow and pat it on to the eye lid. Here, the smudged kajal acts as a primer base for the pigment to stick on to.
4. From here, there are two kinds of smokey eyes that can be done. a) where the lid is darker than the crease and b) where the crease is darker than the lid.
a) Draw another line on the lid with the kajal. This time do not smudge it, just gently blend the harsh line away. Apply another layer of eyeshadow. You will notice that you will get a dark to light gradient effect. If you feel that your eye makeup is still greasy, lightly dust it with more eye shadow till you are satisfied. You can also adjust the darkness of the look by adjusting the amount of kajal you use.Highlight you brow bone and inner corner. Line your eyes with a liquid eyeliner, apply kajal on your waterline and mascara to finish the look.


b) Use the Kajal on the outer corner of your lid. Use the Q tip or ear bud to blend it inwards. Using the fluffy brush, apply eye shadow. If your eyelid is still greasy, then use more eyeshadow. Repeat these steps till the look is dark enough and till you are satisfied. I had to do it twice. Highlight your brow bone and inner corner. Finish off with liquid liner, kajal and mascara.


5. Now, use concealer under your eyes (if required) and set it with powder. Finish off with your favourite, most natural looking blush and pinkish-nude lips.
 | ||
| Look A |
 |
| Look A |
 | |
| Look B |
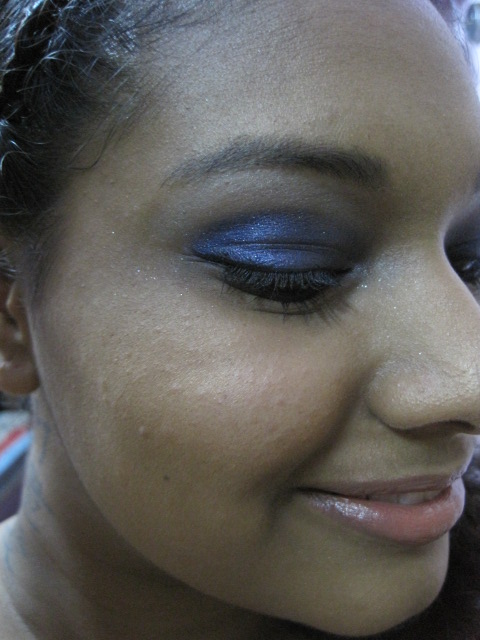 | |
| Look B |
Here are photos of Look B (My fav) in Lavender and Beige:
 | |
| Lavender |
 | |
| Beige |
Sometimes, depending on the shape of your eye, one of the two techniques will look better on you. So experiment, and figure out your smokey eye look! Have fun experimenting with different colors and do comment if you want to see a picture of any particular color. Good Luck!
May 08, 2012
Toucan inspired eyeshadow


First, I used a white-gold color on my brow bone, and pulled it down till my crease, and extended it till my inner corner. Then, i used a black liquid eyeliner and drew a curved line like in the picture. i started from the crease, about 1/3 of my eye, and curved it down till my lash line, just a little away from the outer corner.


I used a matte black eyeshadow and an angled brush to extend the curve outwards, and... Oops! Fallout. I kept cleaning the fallout as i started filling the space in with black eyeshadow.


Once i filled in the black, i used a small fluffy brush and blended it out. Once i peeled the tape off, i had a cat eye shape like this------>
The blending can be avoided i guess, but i didn't want a very hard look.
Also, i lined my lower lash line with orange and red eyeshadow, and drew a VERY thin line using black eyeliner on my lid.
(I also realized that the Toucan colors were looking like a rainbow)

For the rest of my face, i used lacto calamine and loose powder. I used bronzer on my T zone and a warm peach colored blush on my cheeks. For my lips, I tried 3 different colors: a gold-brown gloss, a maroon shimmer lipstick and a matte red one. I can't decide which one looks the best, but i think the strength of a look should depend on the occasion.
 |
| Brown gloss |
 |
| Red Lipstick |
 |
| Maroon Lipstick |
Subscribe to:
Posts (Atom)